Carbs, carbs, carbs.
If you own a GSXR400 you will already know that your carbs are a ticking time bomb ready to cause you misery.
A friend of mine needed a bike for his ACU licence so I stupidly offered my nowhere near ready GSXR. Well that was the kick up the bum I needed to get things ready!
My bike was running rough and I knew that the carbs would be the most likely candidate.
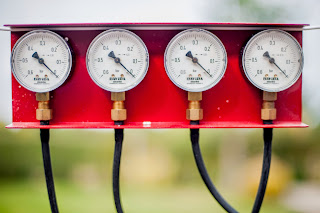
The first place to go is to grab my trusty Davida carb balancing gauges.
I have used the cheaper balancing gauges before which do the job but if you have the spare cash (or do what I did and stalk eBay) you should get a set of these self adjusting gauges.
I simply plugged these into the vacuum take offs on the carb rubbers, podged a funnel into the fuel line, gassed her up and got the bike warmed up.
This is easier said than done when the bike doesn't tick over though as my hands were a bit full and a slight parts deficiency was getting in my way already.
The tick over screw is located in the centre of the carb block and should have a tube attached to it that leads to a knob on the left hand side of the motorcycle for easy access. Mine was missing and the screw is a bugger to get to with the carbs on hence; I popped the carbs off to turn the tick over screw up. I wound a few turns in on the screw and the bike ticked over without the assistance of the choke, whose cable incidentally, was missing as well.
A quick word on the GSXR400's tick over. For some crazy reason the tacho starts at 3,000 rpm but the tickover is supposed to be an oddly specific 1,250-1,500 rpm. This is done by pure guesswork, have fun.
Balancing
To get the carbs balanced you need to warm the bike up and get it ticking over without choke.
Once there you then turn three screws located forward of and in between the carb pairs. You are aiming to have all of the needles pointing in the same direction. Where exactly doesn't really matter so long as you don't have any stuck at zero as that would indicate a serious leak.
You first balance 1 to 2 then 3 to 4 and finally 1+2 to 3+4.
I balanced the first pair with no problems but 3 and 4 would not balance. I wound the screw on 4 either direction with no perceivable change. The tickover had crept very high by now as well.
I shut the bike down, slid the sliders up on the pair of carbs and worked the throttle. It was clear that the butterfly on pot four was lagging behind 3 with a small delay in movement.
So I popped the carbs off and had a look. On the adjuster screw there should be two springs, one either side of the adjuster and one was missing.
Luckily I had another two spare sets of carbs to play with. One was completely rebuilt, the other, on the right, was good for spares. Rather than mess about getting a spring in I opted to fit the other set of carbs.
Whilst I had the carbs off I removed the choke cable from the donor bike and fitted that so I had an easier to operate choke. The other bonus with the new set of carbs was that it had a tickover knob fitted to them.
With the new carbs in, I fueled them up ready to start again.
This time they balanced up without any dramas but the bike felt flat and bogged badly when you opened the throttle through the midrange.
I then noticed excessive fuel spray coming out of pot 3. I killed the engine and immediately saw the problem as fuel continued to flow out of the main jet and pool in the venturi, dripping from the bottom of the carb float chamber.
Floats and seals.
Off came the carbs again and I inspected the float chamber.
It was very clean as advertised with no evidence of damage on the float needle. There was something clearly wrong however so I swapped the float assembly with the first set of carbs. This is easy as the whole plastic assembly just pops out with a pair of o-rings.
Whilst I had things off I gave everything a good clean with carb cleaner. I also took the tops off of all of the carbs and inspected the new rubbers as I couldn't discount them being torn as it wasn't me who rebuilt them. Once I was happy I slapped it all back together.
Back on went the carbs and I stuck some more fuel in. There was no fuel in the venturi but fuel continued to drip form the float chamber so off they came again and a damaged seal was swapped out to fix that problem.
These "rebuilt" carbs were proving to be a problem!
Once refitted again I ran the bike up which was less leaky but no less flat.
Running short on time I opted to refit the original carbs with everything swapped back, a new spring fitted and the tick over knob swapped as well.
The thread on the tickover screw was different however so I was back to the fiddly old one.
I ran the bike up and balanced this set of carbs. Things were still a bit flat but it would at least rev.
I did a little reading and found that for those people who had found that it wasn't seals had had some success by winding the pilot jet screw all the way in and back out a half turn.
This didn't work for me so I put it back to 1 and a half turns out (factory) which worked better.
I was getting to the make or break stage and decided that it was a Suzuki afterall and sounding like crap wasn't a reason not to ride it so I threw on my leathers and took it for a tentative ride.
Test ride
Low down she road like ass but I was surprised when she smoothed out and raced up through the red line.
She was a long way from perfect but quite ridable so handed the bike over to my mate who reprted back much the same although the bike wouldn't tick over any more.
She was a long way from perfect but quite ridable so handed the bike over to my mate who reprted back much the same although the bike wouldn't tick over any more.
Back in the garage
The tickover problem was quickly found to be due to the tickover screw winding itself out and hiding under the starter motor.
I fiddled and faffed a bit before getting to ride the bike myself a few weeks later at Blyton park with the Super Bike School. Again the bike wasn't great but good. Things were better when warm unsurprisingly, with a lot of popping and banging on the overrun suggesting too much fuel with closed throttle.
After 3 good runs the petcock decided it didn't want to close anymore which brought back my leaky carb so I decided to call it a day early and the bike decided to fill my van with fuel. Cheers.
Back in the garage again I swapped the carbs to the other set after having fully stripped and rebuilt them including running wire through the idle ports and pushing out the slide carrier along with the emulsion tubes. These carbs were as clean and as well setup as I could possibly manage now.
Annoyingly the tick over screw had snapped during cleaning so a bolt replaced it till I could get another.
With the carbs back in the bike, it ticked over so smoothely I might have thought it was a Honda! sadly she was still very flat when the throttle was opened.
I'm including the Mikuni carb reference on the right as an aid to understand what has the most effect at any given throttle position. Although my carbs don't work the same as a traditional piston carb the diagram is still pretty relevant.
With tickover good, meaning my idle system was set up well (pilot system on the diagnostic diagram on the right), I moved up to the needle only skipping the butterfly valves as I had balanced the carbs well already.
Changing the needle position did little positive so figuring my carbration was probably good I tried spraying some carb cleaner on the inlet manifolds to check for a manifold leak.
This was a mini breakthrough. The idle rose significantly as carb cleaner misted round the inlet manifolds suggesting a leak.
It came down to an O ring?
Off came the carbs and with the aid of an impact wrench, off came the inlet manifolds.
The rubbers were new and looked pretty good but the metal stacks under them had an O'ring and that looked very sad indeed. It was crusted over with gunk and the engine mating surface showed evidence of leaking.
I cleaned everything up, repainted the metal inlet stacks and ordered some new O'rings.
Finally I was getting to the bottom of this and would have a happy GSXR again.
Or would I?


Comments
Post a Comment